'MediaServer' Skill Help
MediaServer currently supports 129 different spoken intents that address practically everything that can be done with LMS to control music playback and more.
On Alexa-enabled devices with touchscreens (such as the Echo Show family), all commands provide persistent visual feedback using Amazon's APL to either display Cover Art and Metadata extracted from your music's tags, or to visualize the spoken response:
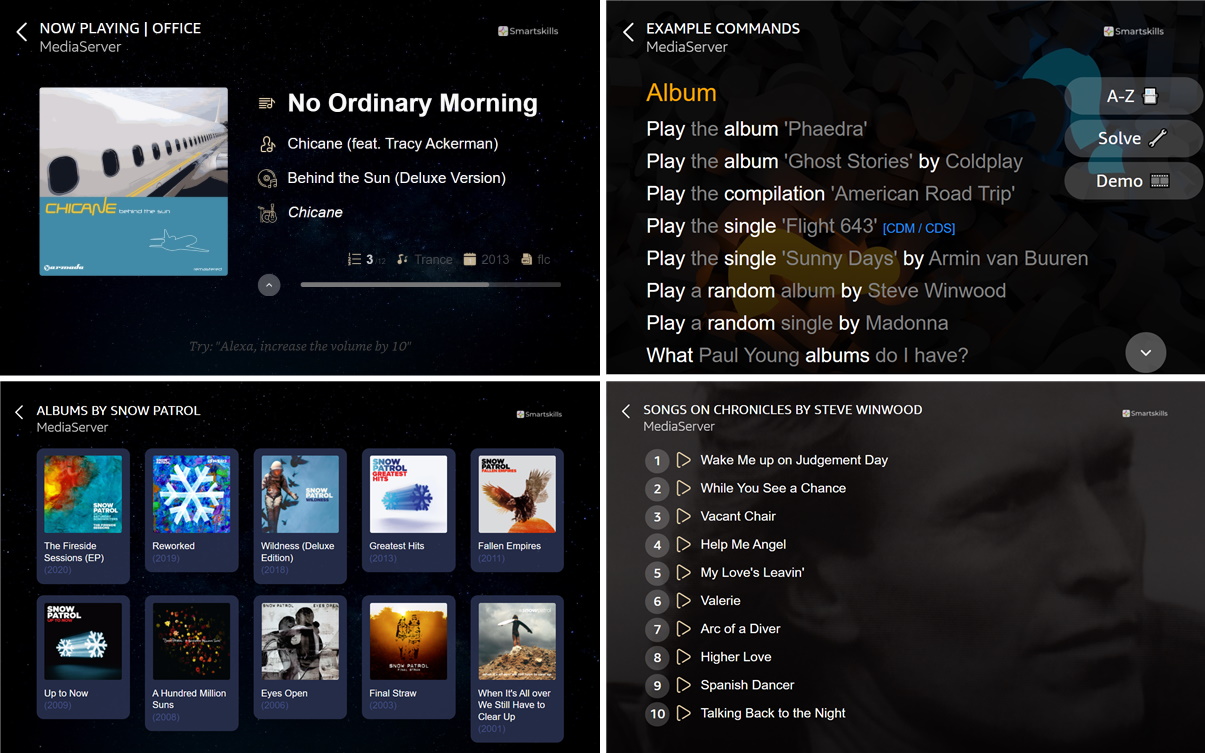
Most responses include touchable control elements which facilitate making further selections using touch after kicking things off with an initial voice command.
In addition to controlling your Squeezeboxes, MediaServer can use the /stream.mp3 endpoint in LMS to stream audio to your Echo. Ephemeral 'AlexaPlayers' appear in the LMS GUI or iPeng for each Echo during streaming. Favorites can be streamed losslessly to your Echo when they address a https URL that identifies as flac.
Before you can use the skill (or its sister Smart Home skill LMS-Lite) you will have to take steps to make your LMS server externally accessible — your Echo may sit inside your LAN, but the Amazon cloud service that it relies on does not. Amazon requires https connections for all skills and it also makes sense to add authentication. We have a special installer you can download to handle this automatically in less than 5 minutes. The how-to is in the Easy Setup tab.
In a word, excellently! A few pointers:
MediaServer uses fuzzy matching extensively in querying LMS, but if your tags are missing, inconsistent, (very) badly-spelled or just plain wrong, there's not much it can do to help. In the end, it's all about your tags !
Remember, the fuzziness is in the skill's code and not in LMS itself (unfortunately) — it can only do its magic if a queried LMS returns something for it to wade through.
Not unexpectedly, Alexa can't get around homophones — words that sound the same but are spelled differently. Think of ate/eight, flour/flower, bare/bear, cell/sell, brothers/bros. If you ask to play a song by the 'Knight Sons' and Alexa thinks that's spelled as 'Night Suns', it will never match your library. Cropped words in tags can also be an issue — e.g. a library search for 'Tru Colors' would find 'True Colors', but not vice versa.
If a query for an item doesn't match, reducing specificity can help. For example, try 'Allman Brothers' vs 'The Allman Brothers Band' or 'Alabama' vs 'Sweet Home Alabama'.
If a search fails, adding context can help. If you ask to play 'Abacab' and it's wrongly spelled as 'Abakab' in your tags, LMS will not return it. However, if you also specify that the artist is Genesis, the skill can fuzzy-match through all your Genesis albums (because LMS will return results for that) and still find Abacab. Without that extra clue, there would never be a match.
During its first run (and also whenever you use the Discover command), the skill retrieves the names of your players from your LMS server(s).
In MediaServer's code, the {Player} slot association in all intents is of the built-in type AMAZON.Room. This biases Alexa towards an understanding of a room name when what you said was not clear enough for outright comprehension. However, this is just a guideline and basically any player name should work. Do yourself a favor though and if you notice that Alexa keeps asking you to repeat the name of a particular player, just rename it for simplicity's sake.
Note that you can freely use the word player in your utterances if you like — you can also mix the use of "in the", "on" and "on the". Commands such as Play the album Mylo Xyloto in the 'Kitchen' and Play the album Mylo Xyloto on the 'Kitchen' player are fully interchangeable.
Using the Rename command it's possible to rename players to something other than the name reported by LMS. This only affects the name used in the skill, not the name known to the server or e.g. iPeng/Material. Re-doing player discovery will offer to revert any renamed players back to their LMS original names.
The skill recognizes Group Players if you have that plugin installed and will mention during discovery how many players it found in that category. Note that the name everything is reserved by the skill to assemble synchronization groups with all your players — it's therefore better not to have your own Group Player called "everything".
Finally, any player names ending in an asterisk (e.g. "Spare*") will be deliberately skipped during discovery.
MediaServer is a so-called custom skill, meaning it has to be invoked using the skill name in your utterance. Given that Alexa herself can play music sourced from e.g. Spotify or Amazon Music directly on an Echo's speaker, you omit the name at your peril !
Some different and freely interchangeable ways of invoking the skill include:
- Alexa, ask MediaServer to play the album 'Phaedra'
- Alexa, tell MediaServer to play the album 'Abacab'
- Alexa, open MediaServer and play some Jazz
- Alexa, launch MediaServer and set the volume to 70
- Alexa, start MediaServer and cancel repeat mode
- Alexa, next track using MediaServer
- Alexa, get what's playing from MediaServer
- Alexa, tell MediaServer to assume the 'Kitchen' player[1]
You can also tell e.g. the Kitchen Echo that "I'm within earshot of the Livingroom Echo". Subsequently, when you issue a command in the open area between your Livingroom and Kitchen Echos, you don't have to worry which Echo actually hears you and assumes the player to target. The skill will check which of the two players is actually playing a song and react accordingly. If both players happen to be playing, normal 1:1 association applies.
[1] This step only exists to make using the 'Play' commands easier. 'Stream' commands always target the Echo you are speaking to.
There are two basic ways to invoke any custom skill: one-shot and session.
With a so-called one-shot, the skill handles a single intent and exits upon completion. An example would be "Alexa, ask MediaServer to play the album Abacab". The music starts, Alexa will tell you that the first track is called 'Abacab', and the skill exits (blue ring off). Great for issuing a single command with no fuss.
A session is started by issuing a so-called LaunchRequest to fire up the skill in an interactive mode. For example, "Alexa, open MediaServer" or "Alexa, start MediaServer". Alexa will greet you with "…say a MediaServer command" and listen for an intent. After each intent is handled, Alexa will repeatedly ask a variant of "… what else?" and keep the session open (the blue ring stays on). You can issue as many back-to-back commands as you like until you terminate by saying one of no, stop, cancel, shut-up, never mind, forget it, or that's it. You can also simply ignore her until she beeps and the blue ring goes off. An example volley might be:
Alexa, open MediaServer
Say a MediaServer
command
Play the album Abacab
The album Abacab, by Genesis, is now
playing on the KITCHEN player.What else?
Increase the volume by 20
Volume is now
65.Anything else?
Disable shuffle by song
OK.Anything further?
Goto track 4
Now playing track 4 of 9 total. It's
"Keep it Dark", by Genesis.Anything else?
No
Goodbye
Note that you can interrupt Alexa's response during a session (e.g. because the answer is rather long) by just saying "Alexa…" and then issuing a new MediaServer command immediately, such as "…what's playing?" or "…track 5". This will break in on her current speech but keep the session open for a new MediaServer command .
Important: Whenever APL is being displayed on the screen of an Echo Show, the session is subsequently held open — even if you actually issued a one-shot command. However, unlike a deliberately-launched session following a LaunchRequest, the microphone is closed (there's no blue bar at the bottom of your screen). To issue a follow-up command while APL is still showing on your screen, you should omit the invocation name and just start the command with "Alexa, …" (to open the microphone) instead of "Alexa, tell MediaServer to…". The hints showing at the bottom of a now-playing screen reflect this syntax and serve to jog your memory. To close this persistent APL-induced session, say either "Alexa, Exit" or "Alexa, Home Screen".
Observe that using any 'Stream' intents will close the session as it does not make sense to continually interrupt music playback on the Echo with a volley of commands.
The stream commands in the skill are made possible by the inclusion of the AudioPlayer interface which natively supports a number of built-in intents. What this means is that any of Play, Resume, Pause, Stop, StartOver, Cancel, Next, Previous, Shuffle, Shuffle Off, Loop, Loop Off can be used without using the skill's invocation name of 'MediaServer'. In other words, when Streaming you can just say "Alexa, pause" instead of having to say "Alexa, tell MediaServer to pause".
This can catch you off guard when controlling regular Squeezebox players instead of the AlexaPlayer. The trick is to either include the player name with the command, or to append 'playback' or 'track' where that makes sense. Explicitly:
- Start playback
- Resume Touch
- Stop playback
- Stop Touch
- Pause playback
- Pause Boom
- Next track
- Previous track
Otherwise, the AlexaPlayer will be targeted !
It's better to avoid using the word "stop" when you just want to silence Alexa after a misunderstanding — say "cancel" or "exit" instead. That way, you won't accidentally stop audio playback.
For an Alexa skill to work, LMS needs to be accessible from the Amazon cloud outside your LAN. This must be a https-secured link and for your own security it should ideally have username/password protection. LMS cannot meet this requirement natively and obliges us to install a proxy to handle it. The free ngrok service is what we recommend for this.
Deploying ngrok entails installing a single binary on your machine that runs in the background and creates a so-called tunnel between LMS and the cloud, giving you a convenient personal static domain (which will include 3 random English words separated by hyphens) such as e.g. https://collapse-brave-zephyr.ngrok-free.app for accessing LMS.
Alexa ⇆ [443/https] ⇆ ngrok ⇆ [9000/http] ⇆ LMS .
Our Easy Setup web-form (see link) helps you to pre-configure and then download a script that will install ngrok for you and also configure it so that the skills can reach your LMS via that static domain. The setup process can target pCP, RPi-OS, Linux, macOS and Windows, with a tailored native script for each OS.
- First, create a free account at ngrok.com. Don't download anything from there as our script will do that for you.
- At ngrok.com go to the Your Authtoken tab from the left pane and copy your authtoken into our form.
- In that left pane you'll also see Domains — select it and then choose + New Domain to the right to generate your free static domain. Copy that into our form too.
You can then complete our form by choosing the OS of the target machine you'll run ngrok on, the LAN IP address of LMS in your local network, and finally choose a username and password to protect the tunnel. Don't re-use a favourite password here as it's stored in plaintext in the ngrok config file on your device.
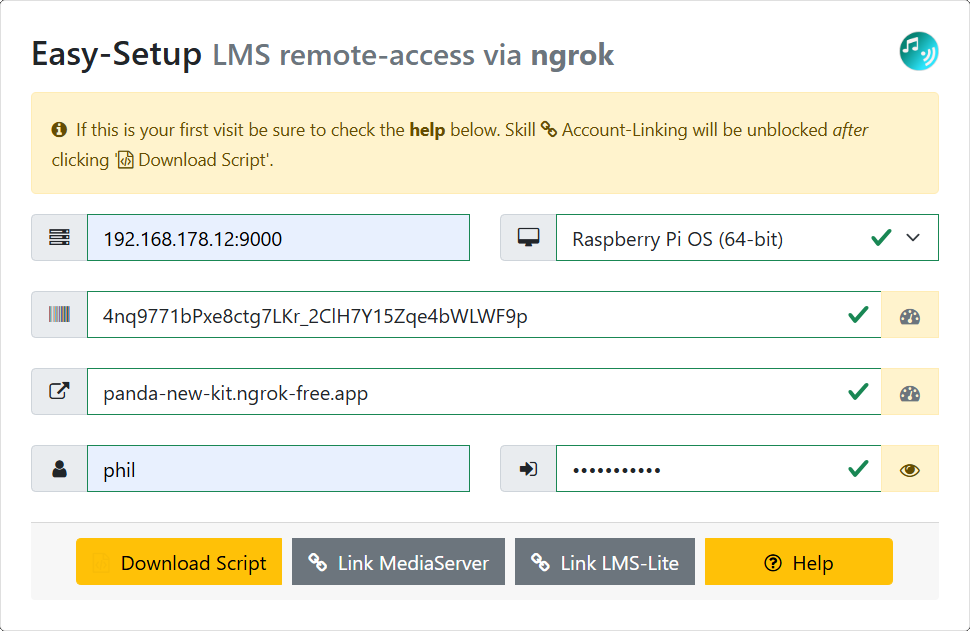
When all that is done press Download Script — your browser may try to block this as a security concern so you may have to deliberately allow the download.
Run the Script
Follow only the appropriate instructions for your OS — pCP, Linux, macOS, or Windows:
piCorePlayer
Make sure that the LMS server under pCP is already installed and running when you attempt this.
- Open a terminal. Place[1] the downloaded file setup.sh in your /home/tc directory.
- Run it using sh setup.sh
Installs ngrok as a persistent tcz package and adds it to onboot.lst. It also builds a file called ~/.config/ngrok/ngrok.yml with your configuration details. An entry in /opt/bootlocal.sh ensures ngrok_startup.sh runs at system boot to continually refresh your tunnel details when you reboot.
Debian Linuxes
Applies to any Debian-based distro which supports systemd services and
bash scripting. Examples include Raspberry Pi OS, Ubuntu, Debian and
Max2Play.
- Open a terminal. Place[1] the downloaded file setup.sh in your home directory, e.g. /home/pi.
- Run it using sudo bash setup.sh
If something does not work and you are wondering if your fetched ngrok binary is the correct version for your architecture, type file /usr/local/bin/ngrok. The output will include something like ELF 64-bit LSB executable, x86-64 or ELF 64-bit LSB executable, ARM aarch64.
Installs ngrok to /usr/local/bin/ngrok and creates a service file /etc/systemd/system/ngrok.service to run ngrok as a daemon at boot. It also builds a file called ~/.config/ngrok/ngrok.yml with your configuration.
macOS
Place the downloaded setup.sh script in your normal
Downloadsfolder.
- In the Finder, open the Applications folder and then Utilities. Double-click on Terminal to pop open a terminal.
- Inside the terminal window, typecd ~/Downloads
- Run the installer using sudo /bin/bash setup.sh (you will need to type your mac password to authorize).
Installs ngrok to /usr/local/bin/ngrok and creates a launchd file /Library/LaunchDaemons/com.ngrok.onstartup.plist to run ngrok as a daemon at boot. It also builds a file called /usr/local/bin/.config/ngrok/ngrok.yml with your configuration.
Windows
- Right-click on the downloaded PowerShell file setup.ps1 in your downloads folder and select the option to Run with PowerShell. If that is not allowed on your PC, see the comments in the file for a simple fix.
Installs ngrok to c:\ngrok and creates a config file called %HOMEPATH%\AppData\Local\ngrok\ngrok.yml. In c:\ngrok, you'll see ngrok_autostart.ps1 and a wrapper ngrok_autostart.cmd. A shortcut to that .cmd file is added to Windows' startup apps folder (usually HOMEPATH%\AppData\Roaming\Microsoft\Windows\Start Menu\Programs\Startup).
[1] If the target system is headless, use ssh or scp via e.g. filezilla, winscp or putty to transfer the script file across.
Account Linking
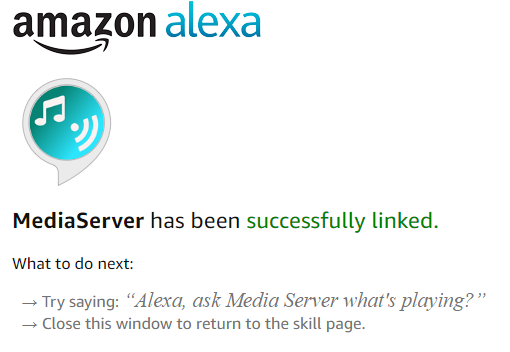
When you press the Download Script button, form-validation takes place and if it passes then the values you entered are all stored in your browser's localstorage meaning they'll magically reappear the next time you visit the Easy Setup webpage. The Link MediaServer and Link LMS-Lite buttons are also enabled. When you click on them, our back-end verifies that an LMS instance is indeed reachable at the fixed domain/credentials you entered. If not, you'll see a warning to check that ngrok is already running. If yes then an Amazon oauth popup will launch. If the browser you are using already has a valid login cookie for Amazon then you'll just see a message asking if it's ok to link the skill in question. If there is no Amazon cookie then you'll first be asked to login to your Amazon account and then you'll see the linking-approval message. This process both installs the skill (if you hadn't yet done that from the skills-store or Alexa-app) and also links the skill.If you have any unanswered questions then you can ask them at the Lyrion forum threads for Mediaserver or for LMS-lite.
ngrok 108 error
On the free plan, ngrok can only be run on a single machine in your local LAN. If it's already running and you start a second instance, you'll receive a 108 error. For a full list of ngrok errors, see here.
No audio using Stream commands
The /stream.mp3 endpoint in LMS requires non-mp3 formats to be transcoded to mp3 for streaming. LMS does this under the hood but it does rely on your system having the LAME encoder utility installed. If you notice that non-mp3 sources produce no sound while streaming, make sure that you have it installed. You can find information on how to do that here.
Windows Server — Run-as-Service
The easy-setup Windows installation procedure runs ngrok in a windowless
process. If you'd prefer to run ngrok as a
service that will survive logouts, do the following. You will need to
use a program that can create services from regular .exe files. An
example of a free program that does this is NSSM (Non-Sucking Service Manager). Download
NSSM and place its exe in the same directory as ngrok. Open a
cmd or Powershell terminal and
cd into the same directory as your nssm.exe.
Run the following command:
nssm.exe install ngrok
select the ngrok executable in the window that appears and add the following to the
arguments:
start --all --config=%HOMEPATH%\AppData\Local\ngrok\ngrok.yml
then press 'Install service'. The service can now be managed from service manager. Start it here
or alternatively open a cmd as administrator and run the following:
sc start ngrok
If the discovery was successful, Alexa will tell you what players she found. Congrats! That list will include any hardware, software or bridged-players (AirPlay, Chromecast, Group, DLNA) visible within LMS. You won't see any AlexaPlayers (Echos) mentioned as they are ephemeral and only appear in LMS when actively streaming something.
The first thing you should try out is associating an 'assumed' Squeezebox player to each of your Echos[1]. Go around to each Echo in your house and say "Alexa, tell MediaServer to assume the [squeezebox-name-here] player". If you only have one player, it will always be automatically assumed for all commands, even if you have multiple Echos. If you have many players but only one Echo, still assign a nearest-player as assumed for the Echo.[2]
Supposing you have a Squeezebox called e.g. Livingroom, try saying "Alexa, get the 'Livingroom' player status using MediaServer" to any Echo. If all is well, she'll tell you several things about what state that player is currently in. Next, try saying "Alexa, ask MediaServer what's playing?" without saying the player name and verify that the response reflects the assumed player's activity.
Note that it's a design principle of MediaServer that you always mention a word describing the library category (song, album, favorite, playlist or genre) in each spoken command requesting playback/streaming. If you were simply to say e.g. "Play Abacab", how would Alexa know to target the whole Album called Abacab or just the track Abacab? Or a favorite called Abacab Radio that you're abbreviating? By requiring that you specify the category in the intent, MediaServer avoids disappointing you unnecessarily.
Now go and check out the Example Commands tab to start enjoying MediaServer fully !
[1] This step only exists to make using the 'Play' commands easier. 'Stream' commands always target the Echo you are speaking to even without knowing what you called it. In fact — to protect your privacy — skills don't have permission to retrieve the name you provided to your Echo in the Alexa app (they are only assigned a 'deviceId').
[2] If you link the skill to multiple LMS servers then you must assign assumed players. Otherwise, Alexa does not know which of your servers the command applies to.
On Echos with screens, this summary is shown when you say "Alexa, ask MediaServer for Help"
Album
- Play the album 'Phaedra'
- Play the album 'Ghost Stories' by Coldplay
- Play the compilation[1] 'American Road Trip'
- Play the single[2] 'Flight 643 (CDM)'
- Play the single[2] 'Sunny Days' by Armin van Buuren
- Play a random album by Steve Winwood
- Play a random single[2] by Madonna
- What Paul Young albums do I have?
- What Sheryl Crow singles[2] do I have?
- List my new[3] albums
- Search[4] new albums for ZZ Top
- Play my most recent Pearl Jam album
- Tee up[5] the album 'Erotica' by Madonna
- What albums contain 'Roxanne' by The Police?
Song
- Play the song[6] 'Dancing in the Dark'
- Play the song[6] 'Chasing Cars' by Snow Patrol
- Play the track[6] 'Sussudio' by Phil Collins
- Play the tune[6] 'Nine Tonight' by Bob Seger
- Play early[7] Bruce Springsteen
- Play recent[8] Adele
- Play songs from 1984
- Play the track 'Run Like Hell' from the album 'Pulse'
- Play the 'Live & Dangerous' rendition of 'The Boys are Back in Town'
- Play something by The Corrs
- Play songs by The Cure
- Play songs about 'Girls'
- Play songs featuring Eddie Vedder
- Play index 3[9] from 'The Wall'
- Append[10] 'Solsbury Hill' by Peter Gabriel
- Add[10] 'Mr. Blue Sky' by ELO
- Insert[11] 'Cradle of Love' from the album 'Charmed Life'
- Append[10] 'High Hopes' from the album 'The Division Bell'
- Add[10] 'Legs' from the album 'Eliminator'
- List the songs on 'The Wall' by Pink Floyd
Genre
- Play some[12] Classic Rock
- Play some[12] Christmas music
- Play some[12] Jazz tracks
- Give me some[12] Oldies
- What genres do I have?
Playlist
- Play my 'Supperclub' playlist
- Play a random playlist
- Load the 'Oldies' playlist
- Add this track to my 'Fitness' playlist
- Bookmark this track
- Blacklist this song
- Clear the current playlist
- Fetch[13] my 'Christmas Songs' playlist
- Fetch[13] the 'Joe Rogan Experience' podcast
- What playlists do I have?
Favorites
- Play favorite 'JAZZ FM'
- List my favorites
- List level 2 favorites
- List the favorites in folder 'Podcasts'
- Play favorite number 3
- Play my fourth favorite
- Play favorite 'Podcasts' item 7
- Play favorite folder 'Audiobooks' item 12
- Play favorite 3 . 2 . 5 [dot]
Query
- What's playing?
- What's coming next?
- What's the duration of this song?
- What's the 'Bedroom' player status?
- List my new[3] albums
- Search[4] new items for Alanis Morissette
- Do I have 'Dark Side of the Moon'?
- Do I have 'Giants' by Chicane?
- Check if I have '101 Driving Songs'
- What players do I have?
- List known sync groups
- List my playlists
- List known genres
- List my Chris Rea albums
- List any singles[2] by Roxette
- List the songs on 'Rumors' by Fleetwood Mac
- Which albums contain 'Roxanne' by The Police?
Follow Me
- Follow me to the 'Lounge'
- Transfer playback from 'Livingroom' to 'Study'
- Transpose 'Kitchen' player and 'Garage' player
Synchronize/Groups
- Synchronize the 'Bedroom', 'Bathroom', 'Office' and 'Nursery' players
- Synchronize everything
- Include the 'Guestroom' player in the group
- Remove 'Library' player from the group
- Cancel synchronization
- List known sync groups
Sleep
- Sleep the 'Bedroom' player in 8 mins 30 seconds
- Sleep this player after the current song
- Cancel sleep mode for the 'Livingroom' player
Alarms
- What alarms do I have on the 'Bedroom' player?
- Enable my 7 AM alarm
- Cancel my 7:30 AM alarm
- Change my 7 AM alarm to 8:30 AM
Player Control
- Start playback in the 'Bedroom'
- Resume 'Kitchen'
- Pause 'Bedroom'
- Stop 'Livingroom'
- Next Track
- Previous Track
- Goto track 12
- Skip ahead 2 minutes
- Skip back 44 seconds
- Seek directly to 17 minutes and 12 seconds
- Set the volume to 60
- Increase the volume by 10
- Decrease the volume by 25
- Mute the 'Livingroom' player
- Unmute the 'Kitchen'
- Turn On the 'Library' player
- Power Off 'Bedroom'
- Power Down everything
- Turn On shuffle
- Shuffle again
- Enable shuffle-by-album on the 'Kitchen' player
- Enable shuffle-by-song for the 'Bedroom' player
- Deactivate shuffle
- Enable / Disable Repeat
- Turn On repeat-playlist mode
- Enable repeat-song mode
- Deactivate repeat for the 'Basement' player
- Rename 'Touch' player 'Bedroom' player
- Discover my players
- Assume the 'Livingroom' player
- I'm within earshot of 'Diningroom'
- Enable / Disable artwork display
Play Music on Echo (Stream)[14]
- Stream the album 'Listen Without Prejudice'
- Stream the album 'Parachutes' by Coldplay
- Stream the compilation[1] '101 Running Songs'
- Stream the single[2] 'Generate (CDM)'
- Stream the single[2] 'Alone Tonight' by Above & Beyond
- Stream my newest album by Peter Gabriel
- Stream the song[6] 'Rosalie'
- Stream the song[6] 'Chocolate' by Snow Patrol
- Stream the track 'Sledgehammer' from the album 'So'
- Stream early[7] Coldplay
- Stream recent[8] London Grammar
- Stream songs from 1976
- Stream the 'Plastic Letters' rendition of 'Denis'
- Stream something by The Police
- Stream songs about 'Alabama'
- Stream songs featuring ATB
- Stream index 7[9] from 'Musique' by Daft Punk
- Stream a random album by Pink Floyd
- Stream a random single[2] by Shakira
- Stream some[12] Alternative Rock
- Stream favorite number 7
- Stream favorite 'FUNK FM'
- Stream my 'Ambient' playlist
- Stream a random playlist
- Stream favorite 'Podcasts' item 3
- Stream favorite folder 'Audiobooks' item 4
- Stream favorite 2 . 4 . 2 [dot]
- No invocation-name required for: Resume, Continue, Pause, Stop, Cancel, StartOver, Restart, Start Again, Next, Skip, Skip Forward, Previous, Go Back, Back Up, Skip Back, Shuffle, Shuffle Off, Stop Shuffling, Loop, Loop Off
General
- Help
- Display
- Repeat
- Say that Again
- Never Mind
- Forget It
- Exit
- Yes
- No
- No Thanks
- What's new?
[1] A compilation is defined as an album with the albumartist or band tag being one of Various, Various Artists, VA or V.A. (case-insensitive).
[2] A single is any album with the term CDS or CDM in the Album tag (brackets are ok).
[3] Lists the 10 latest albums scanned to your library.
[4] If the search item is found among the latest 100 additions scanned to you library, Alexa will offer to play it for you. If more than one item matches, you get to choose one.
[5] The Tee Up syntax is used to append an entire album to the end of the now-playing playlist. It's basically an 'Append' but that word is reserved for appending a song.
[6] This will enqueue one each of all the uniquely-named versions of that song from all albums that contain it, with the oldest (by year) version having the shortest name queued to play first. To limit playback to a specific version of the song from a named album, use the rendition or the from-the-album variant of the command instead. If your Echo has a screen, you'll see the unqueued versions at the bottom of the screen and can tap one if you want it to play.
[7] 'Early' enqueues songs from the first half of an artist's oeuvre, based on the year tag.
[8] 'Recent' enqueues songs from the second half of an artist's oeuvre, based on the year tag.
[9] 'Index' enqueues the entire album in question but jumps immediately to the requested index. The rest of the album will continue to play after that track.
[10] The item is added to the end of the currently-playing playlist.
[11] The item is inserted into the current playlist and will play next, pushing other tracks down the list.
[12] Some always specifies a genre. Use something (by) to enqueue tracks by a named artist.
[13] Fetch targets a Spotify playlist or podcast specifically (when e.g. you have a local playlist with the same name but want the Spotify one).
[14] Note that your Echo devices will not show in the LMS GUI until you first start a stream by voice. They will also disappear again from the GUI when the stream ends. While available in the GUI, if you change the now-playing track other than by voice, saying "Alexa, Resume" will immediately activate the new track. If you don't say this, you will have to wait for the Echo's buffer to empty before the change will take effect.
With LMS-lite enabled, your Squeezeboxes become part of Amazon's smart home paradigm and show up as a device in the Alexa app, meaning they can be included in a group with other smart home devices and used in a routine to do clever things like switch an amplifier on/off together with a Squeezebox or automatically start music playback whenever you enter a room.
Once you account link the skill successfully, you just say "Alexa, discover devices" (this should also be done any time you add, delete or change a player name in LMS). Because of how smart home skills work, you may not be told if any devices were found — rest assured they will nevertheless show up in the Alexa app when opened.
During discovery, your player names are untouched by the skill and reported as-is to Alexa (except for removing disallowed characters). If you have unwieldy names like Onkyo-XTR672VMK, you might want to edit/change them in the Alexa app because you cannot abbreviate player names much when issuing commands.
Once a player name has been mentioned in any of the commands, it persists until a different player is mentioned (or some other music-playing skill is launched) from that particular Echo. This means you can omit the name in the next command(s) addressing the same player. Each Echo has its own persisted Squeezebox too, so remember that fact if you move to another room and issue a name-free command there. If in doubt, always mention the player name in the command.
The available categories of command, with invocation examples are:
Power
- Alexa, power ON 'Livingroom'
- Alexa, power OFF the 'Bedroom' Player
- Alexa, turn ON the 'Touch'
- Alexa, turn OFF the 'Library' Player
Volume
- Alexa, set 'Kitchen' volume to 70
- Alexa, volume 20 on 'Touch'
- Alexa, increase the 'Bedroom' Player volume by 10
- Alexa, pump up the volume
- Alexa, pump it up
- Alexa, louder
- Alexa, make it louder
- Alexa, louder please
- Alexa, quieter
- Alexa, tone it down
- Alexa, lower the volume
- Alexa, decrease the volume by 20
- Alexa, mute the Livingroom Player
- Alexa, unmute Livingroom
Transport
- Alexa, next track on 'Lounge' Player
- Alexa, next
- Alexa, skip this
- Alexa, previous track on 'Touch'
- Alexa, previous
- Alexa, go back
- Alexa, play on the 'Office' Player
- Alexa, resume 'Bedroom' Player
- Alexa, pause
- Alexa, stop
- Alexa, rewind[-60 sec]
- Alexa, fast-forward [+60 sec]
Track Index
- Alexa, start-over [ → track 1]
- Alexa, track 7 on 'Kitchen' Player
- Alexa, song 9 on 'Touch'
- Alexa, what track is the 'Touch' at?
- Alexa, what track is the 'Bedroom' Player on?
Favorite/Preset
- Alexa, favorite 3 on 'Touch'
- Alexa, preset 1 on the 'Office' Player
Looping [repeat-playlist]
- Alexa, turn ON 'loop' on 'Kitchen'
- Alexa, activate 'loop' on 'Bedroom' Player
- Alexa, turn OFF 'loop' on 'Office' Player
- Alexa, deactivate 'loop' on 'Squeezeplay'
- Alexa, is 'loop' ON, on 'PiCorePlayer3'?
Shuffle Play [shuffle-by-song]
- Alexa, turn ON 'shuffle play' on 'Kitchen'
- Alexa, activate 'shuffle play' on 'Bedroom' Player
- Alexa, turn OFF 'shuffle play' on 'Office' Player
- Alexa, deactivate 'shuffle play' on 'Squeezeplay'
- Alexa, is 'shuffle play' ON, on 'PiCorePlayer3'?
Repeat Mode
- Alexa, set 'repeat mode' on 'Livingroom' to 'OFF'
- Alexa, set 'repeat mode' on 'Kitchen' to 'song'
- Alexa, set 'repeat mode' on 'Office' Player to 'playlist'
- Alexa, set 'repeat mode' on 'Bedroom' to 'album'
- Alexa, what is the repeat mode on 'Bathroom' Player?
Shuffle Mode
- Alexa, set 'shuffle mode' on 'Kitchen' to 'OFF'
- Alexa, set 'shuffle mode' on 'Bathroom' to 'song'
- Alexa, set 'shuffle mode' on 'Study' to 'playlist'
- Alexa, set 'shuffle mode' on 'Library' to 'album'
- Alexa, what is the shuffle mode on 'PiCorePlayer3'?
With an Alexa routine, you can have a single trigger send a volley of commands to a player — much like a smart-home 'scene'. A trigger can be a self-defined voice command, time of day, or input from a sensor such as motion/contact/illuminance. Any combination of player Power (on/off), Favorite (#), Loop (on/off), Player Volume (0-100), Preset (#), Repeat Mode (off/song/album), Shuffle Mode (off/song/album), Shuffle Play (on/off) and Track (#) can be assigned to a single trigger. Players can respond differently to multiple triggers.
To control a player in a routine, in the Alexa app select routines and under at the top right, select the add action option. Then, under add new select the smart home trigger. Under all devices you should see your players distributed alphabetically among all the other devices. If you select one of your players, you will see the options for Power, Favorite, Loop, Player Volume, Repeat Mode, Shuffle Mode, Shuffle Play, Track. Under each of those will be options like on/off or off/track/album, and, for favorite/track/volume, a slider to set a value from 1 to max. You can specify more than one category of these commands and have them all triggered at once when that action runs.
Note that if you have no recognized event triggering devices such as door contacts or motion sensors among the gadgets in your Amazon account, you may not see any devices under actions. In that case, you can still add the players to groups so they at least power on/off with the other devices in the group, although you then have less settings options than in routines.
The skill implements 129 intents, 94 of which are free to use with 35 requiring a subscription. The Command Reference section denotes premium commands with an asterisk after the name, but basically any commands starting with 'Play' fall into this category. Note that the 'Stream' equivalents are free to use.
The activation is handled as an In-Skill Purchase (ISP) which is managed entirely by voice. There is no minimum contract period and subscriptions can be cancelled at any time. Ask "Alexa, how do I enable voice purchasing" for help.
To access premium commands, just say "Alexa, tell MediaServer I want a subscription". She'll explain the applicable pricing structure for your regional Amazon account and ask for a verbal yes/no confirmation (plus your voice PIN code if you enabled that) so you can safely experiment with the ISP process without actually committing.
First-time subscribers can access a free 7-day trial. Thereafter, the credit card associated with your Amazon account will be billed monthly but you can cancel at any time. Just say "Alexa, tell MediaServer I want to cancel my subscription".
Availability in your Region
If you attempt to subscribe but receive a message along the lines of "sorry, this content is not
available for purchase in your country…" you can very easily temporarily set your
Amazon marketplace for Digital Content (a.k.a. Kindle)[1] to .com (or .co.uk) to enable the skill and then
subscribe. Don't worry — you can change it back again when finished, and the
subscription stays intact after reverting.
If Alexa does not speak your native language and you'd prefer en-US (or en-GB) as locale setting, then by all means leave it set this way indefinitely. Either way, you can allow your Echos to speak either American or British English at will.
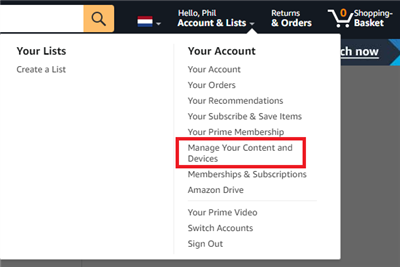
To make the change, go to your 'own' Amazon URL (e.g. amazon.nl) and
under Your Account, select Manage your Content and
Devices:
Then select Preferences:

and click on Country/Region Settings to fold it out. You'll see:

It's worth clicking on the link 'click here to learn more about other Amazon sites you are eligible to shop on based on your country/region of residence' to see if you're already 'allowed' to set your content-store to .com or .co.uk. If so, you're done already, if not then there's an extra step:
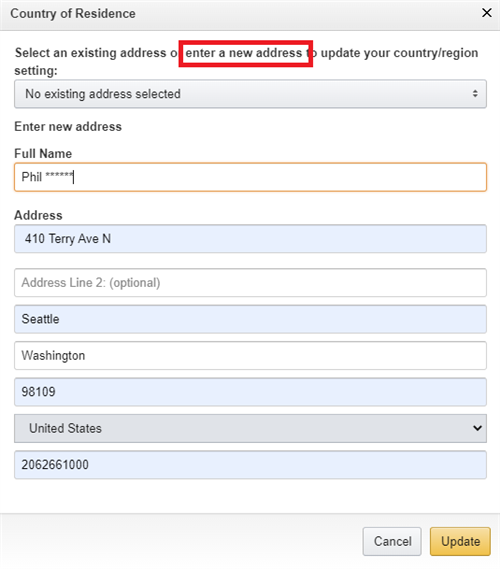
For .com, click the Change button and then under Enter new address type e.g. the particulars of Amazon's HQ at 410 Terry Ave N, Seattle 98109, Washington, USA, phone 206 266 1000 (any valid US address is acceptable and Amazon's helpdesk have confirmed this is allowed):
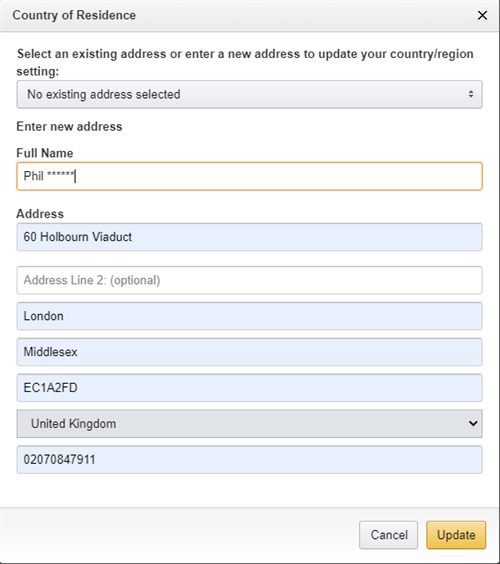
If you would prefer to target .co.uk, under Enter new address type e.g. the particulars of Amazon's AWS London office at 60 Holbourn Viaduct, London EC1A 2FD, Middlesex, United Kingdom, phone 020 7084 7911 (any valid UK address is acceptable and Amazon's helpdesk have confirmed this is allowed):
After pressing 'Update', you'll see an 'are you sure?' screen like this:
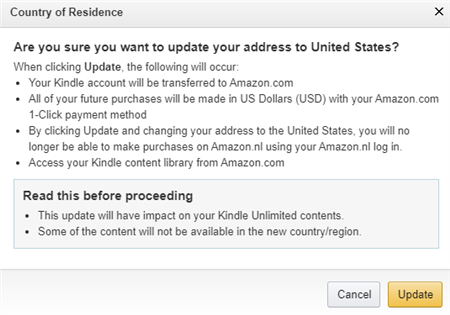
The text sounds a little off-putting but remember that this is only for Digital Content and
not regular shopping. You can very easily change things back to the way they were
because you won't replace your existing Amazon details with this new address, you'll just
add an extra choice and create a new 'bucket' for Digital Content that will co-exist with
your 'old' one. Go ahead and select 'Update' and you should see confirmation:
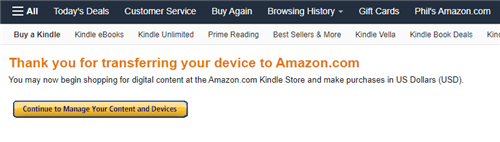
Your changes may trigger a banner message (which you can ignore) about you being able to shop
for content on your 'own' local Amazon domain (proof that Amazon still 'knows' you at your own
domain):

Note that to change back again, you will need to do so via Manage your Content and Devices at the new Amazon domain and not from your 'own' domain.[2]
When you now go to the Alexa app or web-portal[2], don't panic if you no longer see any installed skills from your 'own' store. They will reappear when you change back (verified). MediaServer will likely not yet be installed at your new domain because you tried it first at your 'own' domain. Search for it at your 'new' store and install — the prior account linking should stay intact but if not then go ahead and link.
Any new attempt at subscribing should now succeed and the subscribed state should survive transitioning back to your 'own' store.
[1] For historical reasons, Amazon still refers to digital content like skills as being in the 'Kindle' (e-book) category.
[2] You may need to log out and back in to your Alexa app/portal for the changes to take effect.